Wednesday, August 26, 2009

DIY fake wasp nest update

So it's been awhile since I first made and hung the fake wasp's nest (see this old post).

I've had many people ask me how they've worked. All in all I'm really happy with them. After a couple months (and a few rains), two of the bags burst and the stuffing fell out. But the bags were still hanging and looked kindof the same so I left them. I have not seen any wasp nests in our yard. I know there's not because I've been looking. I've been looking because there have been quite a few wasps in our yard, especially the last few weeks.

I heard a quick story on the news that Calgary is having quite a battle with wasps this year. Pest companies are extremely busy, and wasps are #1 on their complaint list.

So yes there are many wasps (they love my container garden it seems), but I do feel like I've been successful as there are no nests. We live right next to a large greenspace, so I'm sure there's a ton of nests close to us, but not in my yard!

I will be doing this again next year!

Jen Made Bread!!

Yes I did! We have been trying to make more of our own food and eat less prepackaged and processed food. And something that we eat a lot of is bread. Gareth has been wanting me to try making bread for ages, but I was pretty intimidated. Something about all the kneading, and resting, and punching, and I don't know, it seemed so complicated. My mom lent me a bread maker, but I never did get around to trying that. Then I came across a review of the book Artisan Bread in Five Minutes. That got my attention! I reserved it at the library, but it was so popular I would be waiting a few months. So Gareth surprised me with the book!

And what do you know? I made bread!

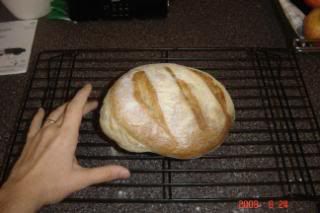
I started with the basic recipe, and made a boule loaf. It was small, and a little dense, but it was good!

Photobucket

Then I tried again and made a partial whole wheat loaf, and it turned out much better.

Photobucket

And then I tried a cinnamon raisin loaf. That is one of my favorite breakfast meals. It turned out awesome!!

Photobucket
Photobucket

So I highly recommend that everyone runs out and gets this book. There are a ton of recipes, all with the same basic procedure. But the title is a tad misleading. The main premise is that you make up enough dough for four loaves, then it sits in your fridge for up to two weeks. Mixing the dough doesn't take long at all. But then it needs to rise for two hours, then refrigerated overnight. Then before you bake it, it needs to rest again at room temp for 40min. Bake for 30min. So while you may only be hands on for 5min, there is some preplanning to take in all the rest periods.

But you just can't beat freshly baked bread! (Especially the cinnamon raisin loaf!)

Saturday, August 1, 2009

My potatoes in a bag

For dinner tonight, we harvested the first two hills of potatoes. It was early, so I wasn't sure what to expect. But what did I have to lose?

I decided to dig up the bag of potatoes. Out of all the hills, this was the one I was most curious about how/if it was working.

So here is the bag before, you can just see it under the foliage...

Photobucket

Here is what it looked like on it's own...

Photobucket

I dumped the bag into a bin, dug out the potatoes, then put the dirt back in the bag.

Photobucket

And here are the potatoes! The yield was small, but it was early. These were planted about 10wks ago. Another few weeks and I think the yield would've been much better. But the quality was amazing! We grilled them on the bbq in olive oil, garlic, salt and some onion. My mom and stepdad were here to share in them, which was great considering their contributions to my garden. And hopefully they'll be able to share in many more meals to come. I have 20 more hills!

Photobucket
Photobucket

Vegetable container garden Wk 11 harvest

It has been about 11wks since planting most of my vegetables. And finally we are starting to eat quite a bit from it. First it was spinach and lettuce, both of which are done now, and now we're into the peas and zucchini's. I have four zucchini plants, and it is fruiting like mad. We're also finally getting good sweet yummy peas. I have six pots of peas, three that were planted in one batch, and the other three were planted two weeks later in a second batch. I don't know what happened, but my first batch have all died. I managed to get a few peas off of them, but not much. My second batch seems to be doing much better and I'm getting more peas. We're snacking on about 6 pods/day. Hopefully this is just the beginning, but that may be it with such a small amount of plants. Next year I was to do waaaay more peas. I love love love them!

Here's what we had the other night. Another day or so and we should have that much zucchini again!

Photobucket

And while not a vegetable, I'm excited to say my cosmos have finally bloomed! Those too took about 11wks since I planted the seeds. A little too long to wait, next year I might do a bunch of indoor sowing so I can enjoy them much earlier. There are only a few flowers at this point, but hopefully they'll explode soon!

Photobucket

Homemade worm bin update

So I haven't mentioned my vermiculture bin (aka DIY worm bin) since I made it. There really hasn't been much to mention. It lives under my sink, I put in a few handfuls of chopped fruit/veg scraps once or twice a week, and you'd never know it was there. There is ZERO smell, no bugs, no escaping worms. But there are a ton of worms. Many more then I started with. Healthy, big, red worms. Probably double at least. And there is compost. Lots and lots of compost! As someone who had know idea what I was doing, I can tell you that it is easy to tell when it's finally turned to compost. The bin is much heavier then when I started, and it's rich, black, moist compost.

So I've decided it's time to get the compost out and start again. But how do I do this without losing all my worms? I have no idea if this will work, but here's what I'm doing.

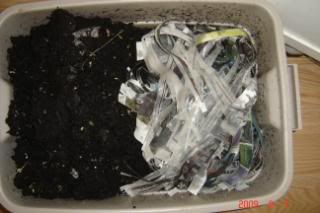
I have pushed all the compost over to one side of the bin. I am not feeding them on that side anymore. My only concern is that it's so heavy, I don't want them squished under the weight. But I have to have faith that instinct will lead them out. On the other, now empty, side of the bin, I have started fresh. I have fed them some moldy strawberries, covered it with several inches of damp newspaper, and voila. The plan is that all the worms will migrate to the new side for food, and I will be left with one side of compost that I can then take out for storage (I won't be using it on my gardens this year, I'll save it for next).

There isn't much to take pictures of, it's hard to see all the worms in a picture. But here is what it looks like with the two sides set up. I figure I'll leave it like this for 2-3 wks to make sure as many worms as possible make it to the other side.

Photobucket